
Follow me on:


Jesper Broe Photography

Blog Archives
Project – Antenna rotor #1 – Design
 05/05/2016
 Projects
Project – GPIB bus interface #1 – Introduction
05/05/2016
Project - GPIB bus interface
In episode one I discuss the GPIB protocol and how data and commands are transferred on the bus.
Project – GPIB bus interface #2 – Schematic
05/05/2016
Project - GPIB bus interface
In this installment, I discuss the design choices and how I arrived at the final schematic for the GPIB bus interface.
Project – GPIB bus interface #3 – PCB layout
05/05/2016
Project - GPIB bus interface
In the 3rd episode, I discuss the PCB layout.
Project – Antenna rotor #1 – Design
05/05/2016
Antenna rotor
Sinclair ZX-80
28/07/2015
Sinclair Research
I bought this one on e-bay for 20 GBP years ago. It has everything except the packaging box, including a burned-out voltage regulator, due to the typically unreliable Sinclair design. I will have a post at some point when I fix it.
Sinclair ZX-81
29/07/2015
Sinclair Research
I first used this in the local bookstore. I sat there the whole day discovering the joy of FOR NEXT loops entered on a junk foil keyboard. And yet, I preferred this one to the VIC-20 which was I could use at the local Fona TV and Radio store.
Now, I finally got two of these, both as kits. I assembled one and I still have both, including the un-assembled one.
Memotech MTX
29/07/2015
Memotech
This was my dream computer. It was stunning and was upgradeable to CP/M. WOW! In fact, it is still stunning. Probably the sexiest computer I have ever seen. I bought mine off of ebay for a song several years back. Works great too, with the exception of the keyboard. From what I can see, a 74LS something chip needs replacing. I will do a post of the repair at some point when I get round to it.
Sinclair ZX-Spectrum
29/07/2015
Sinclair Research
This was my first real computer. I bought it when I was 13, and I never looked back. I had this machine for five years, and knew it inside out. I lived in a piece of the world where games were not easily available, and I spent all those years programming it. I learned BASIC programming on this machine, I learned assembly programming when I outgrew BASIC, and I built electronic hardware for it, including my own Kempston compatible joystick interface, EPROM programmer and speech synthesizer. I still have all in a box somewhere.
Oric 1
29/07/2015
Oric (Tangerine)
I found this one in a junk box in Sim-Lim Tower in Singapore, and got it for S$20. It must have been around 1996.
Oric Atmos
29/07/2015
Oric (Tangerine)
Bought one off of ebay last year for 40 GBP.
Atari 520ST+
29/07/2015
Atari Corporation
I bought this computer after my ZX-Spectrum. It was an amazing step up, with the slight difference that the Atari was not 100% complete when I got mine. The ROMs were not done, and I had to load the operating system from a floppy, and the BASIC programming language was full of bugs. For someone who spent most of his time programming, or building hardware, this was a massive problem. I got around it by teaching myself 68000 assembly.
ICL Comet
29/07/2015
ICL
I WANT THIS MACHINE. If anyone has one lying around, please let me know.
Commodore PET
29/07/2015
Commodore Business Machines
I bought one of those in DBA.DK for a song. It has the square point-of-sales keyboard, and is fully working.
Commodore VIC-20
29/07/2015
Commodore Business Machines
I have two of these. Both with the original square power-supply.
Commodore 64
29/07/2015
Commodore Business Machines
This machine is a load of crap. It was a piece of junk then, and it’s a piece of junk now. I have two of these, bought from an old dude who had used it for running his shop. It came with a couple of CBM printers, diskette drives and an inventory database on floppy disks.
Commodore 64 WebIt
29/07/2015
Commodore Business Machines
I have a really long story about Escom and how this computer came about. I bought one from Germany 3-4 years back.
Commodore 128
29/07/2015
Commodore Business Machines
Got one from the same gentleman who sold me his Commodore 64’s. I got another one at a car boot sale.
Sharp PC-1245
29/07/2015
Sharp
I bought this computer in Germany in 1983.
Epson HX-20
29/07/2015
Epson
The Epson HX-20 was the worlds first propper laptop. I have 5 of these, all in immaculate condition.
My electronics lab
28/07/2015
My electronics lab
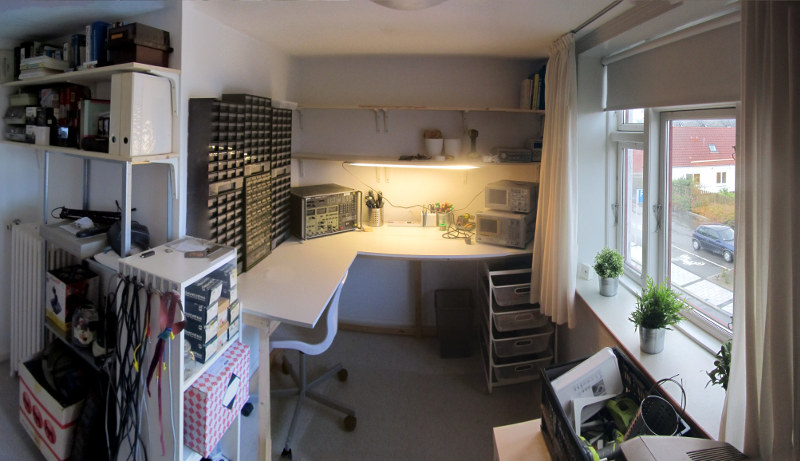 I have just converted one of the guest-rooms into my new electronics workshop. There is proper seating, loads of shelve-space, storage and room for my equipment. I have even got more power-points installed and swapped all the old fabric-covered house-wiring updated to proper double-insulated plastic cables.
The other half of the room is used for storage. I have installed eight IKEA HYLLIS metal shelving unit behind a curtain.
My current equipment includes:
Soldering station
Hot-air rework gun
Multimeters
LCR meter
Audio signal generator
100 MHz digital oscilloscope
6.5GHz spectrum analyzer
RF signal generator
RF measurement rig
High-end PC with CAD software.
Microchip PIC ICD2 and PICkit2
27Cxx EPROM Programmer
UV Eraser
Which I think is fairly OK for a hobbyists rig. In fact, throughout all my years as an electronics engineer in Asia, I have never had this must equipment available before.
My electronics lab – Before the new layout
05/05/2016
My electronics lab
In this video I do a small tour of my electronics lab.
My electronics lab – Rotary component storage
05/05/2016
My electronics lab
In this video, I build a rotary component storage unit using a lazy susan and drawer cabinets.
My electronics lab – Space-saving arrangement for soldering irons
05/05/2016
My electronics lab
In this video, I discuss a convenient way of placing the Weller soldering iron controllers.
My electronics lab – Convenient component storage
05/05/2016
My electronics lab
In this post, I show how to optimize the space in my electronics lab by utilizing the space under the windows.
My electronics lab – Build a 19 inch rack for 6 euro / $10
05/05/2016
My electronics lab
In this video, I build a sturdy 19″ rack for less than 6 euro.
My electronics lab – Related posts
28/07/2015
My electronics lab

Antonov An-2 – Introduction
30/12/2011
Antonov An-2
 After my visit to Poland, where I saw the Antonov An-2 close-up for the first time, I have wanted to model this aircraft. The aircraft is the aviation equivalent of a farm tractor – big, strong and slow. The plane has a metal fuselage and huge fabric covered biplane wings.
Antonov An-2 – 3-Views
30/12/2011
Antonov An-2
 There are several good 3-views on various Russian web-sites. I have picked the most detailed and will be working based on that, as well as my photo collection.
Antonov An-2 – Other versions
05/11/2012
Antonov An-2
 I have discovered a couple of really interesting versions of this airplane. One is the Antonov An-6, which is a high-altitude meteorological aircraft, and the An-2F, which is an artillery aircraft. The An-6 has a seat in the tail of the aircraft, and the An-6 has a huge glass-house half-way, and a tiny boom tail. Both are definitely worth modelling, and I have 3-views for both.
Antonov An-2 – Walk-around
14/05/2012
Antonov An-2
This is the colour-scheme I have chosen for this amazing aircraft.


Antonov An-2 – Scale
05/11/2012
Antonov An-2
The An-2 is one of those aircraft where a scale of 1:5 is way too big, and a scale of 1:10 is too small. After some consideration, I have decided on a scale of 1:10:
wingspan: 1,818 m
length: 1,274 m
height: 0,468 m
Antonov An-2 – Approach
05/11/2012
Antonov An-2
The approach I will be taking, is one where the wings, and front fuselage remains identical, and the tail can be swapped, to give either an An-2, An-2F or an An-6. The An-2F in particular will require some brain-power. The mid-section of the aircraft has to be stong, yet transparent, and definitely not going to be easy to model.
Antonov An-2 – Project start
05/11/2012
Antonov An-2
 As always, I started off by scaling the 3-views and then by drawing the side and top views. This time there were no major problems with the 3-views, and it all went really smoothly.
Antonov An-2 – Fuselage lofting
08/11/2012
Antonov An-2
 I have now lofted the fuselage, based on the fuselage formers drawn in the 3-view.
After matching the lofted pieces with the flat fuselage top and bottom views, it is quite easy to see where the fuselage formers are off. I will address those problems next, together with the glass at the cockpit area.
I know from experience that the cockpit glass will prove difficult, but for the Antonov An-2, with such a distinct feature, it is essential to get it right.
Antonov An-2 – Related posts
05/04/2015
Antonov An-2
AT-6 Texan – Introduction
15/11/2012
North American AT-6 Texan
 The AT-6 Texan was the world’s favourite trainer after WWII – well maybe not, but it was used in a truckload of countries, mostly because it was sold cheap as surplus.
AT-6 Texan – Scale Dimensions
15/11/2012
North American AT-6 Texan
I will be designing the model at a scale of 1:5, resulting in the following dimensions:
wingspan: 2560 mm (approximately 100.8″)
length: 1798 mm (78.8″)
AT-6 Texan – 3-View
15/11/2012
North American AT-6 Texan
 My 3-view is from a book from “Allt om Hobby” in Sweden.
AT-6 Texan – Approach
15/11/2012
North American AT-6 Texan
 As always, I started off by scaling the 3-views and then by drawing the side and top views. This time there were no major problems with the 3-views, and it all went really smoothly.
AT-6 Texan – Related posts
05/04/2015
North American AT-6 Texan
AVRO 504K – Introduction
08/08/2010
AVRO 504K
 The AVRO 504K was a great flyer, and the standard allied WWI trainer. The Danish Navy owned six from 1921 to 1931.
Det Danske Luftfartselskab (Danish Airline Company) purchased two AVRO 504K in Britain during 1919, but they were never used and later sold on to the Royal Danish Army. The army acquired an additional two aircraft, and they were used until 1931. The Royal Danish Navy purchased six during 1920. A total of 5 crashes, but were substituted for the 504N.
The aircraft were flown with the typical AVRO landing gear, as well as with floats.
Some websites says the length was 29 ft, the original manufacturing drawings say 28’11”, and other sources say 29’5″. Some, like Windsock Datafile No. 28 says both.
Specifications:
Wingspan: 10.973 m
Length: 8.814 m ?
Height: 3.17 m
Empty weight: 558 kg
Max weight: 830 kg
Max speed: 145 km/h
Cruise speed: 126 km/h
Engine: Le Rhone 80 HP
AVRO 504K – 3-View
30/03/2011
AVRO 504K
 I have pieced together a 3-view from photographs I took of the original drawings from 1923. This work has been done, and I am importing them into Alibre CAD, practically as I type this. With a scale of 1:5, this model is going to have the following dimensions.
Specifications:
Wingspan: 2.194 m
Length: 1.794 m
Height: 0.634 m
AVRO 504K – Wing Profile
17/11/2012
AVRO 504K
 I have been looking through old books and documents to try and find the wing profile used. Eventually found that the profile changes slightly from wing-root to wing-tip.
AVRO-504K – Walk-around
17/11/2012
AVRO 504K
I have loads of photos of this aircraft, taken at the RAF Museum at Hendon. Here are a couple of photos from my collection.


AVRO 504K – Mk I vs. Mk II
17/11/2012
AVRO 504K
I’ve got quite a headache at hand. The dimension on the construction drawing says 8.814 m, which is 28’11” in imperial dimensions, while Jane’s All the Worlds Aircraft from 1919 says 26’6″. Which one is correct? Where is the length measured from? The skid or the propeller?
There is also the AVRO 504K Mark II, which is an improved Mark I. The Bjorn Karlstrom drawings are of the AVRO Mk II, and by scaling up the 1:72 drawing, I get a length of 28’6″ for the Mark II.
AVRO wrote in a brochure for the AVRO 504K Mark II:
- A New” Oleo” undercarriage is fitted.
- An adjustable Tail Plane arranged for dual operation, enabling the machine to be trimmed for different speeds and varying loads.
- Altered Centre Section Plane and Wing Roots, allowing a much greater range of upward and forward vision.
- New shape Ailerons to lighten and harmonise the lateral control with the elevator and rudder controls.
- Direct gravity feed for petrol.
From what I see, the fuselage formers are also of a different shape. The length might possible also have been reduced 6 or 12 inches.
From what I can deduct from photos of the Danish AVRO 504K, it is a Mark I. So why did they write 8.814 m on the construction drawings? It just doesn’t make sense. I need more information.
AVRO 504K – Dimensions Finally?
17/11/2012
AVRO 504K
 I finally found some original AVRO documents showing the measurements. It’s from a rigging manual. It either says 29’5″ or 29′.5 (i.e. 29’6″).
Unfortunately, the text underneath says “length: 28 ft 11 in”, so I am still none the wiser.
The difference is 7 inch – enough to make a difference!
AVRO 504K – What Size Is It?
17/11/2012
AVRO 504K
 I have now overlayed the two drawings, to see where they differ. To be honest, there is practically no difference, with the exception of:
- Cowl fillet.
- Wheel size.
- Angle of skid.
As to the size, what makes one 28’11” and the other 29′ and the third 29’6″ long, is still not clear.
AVRO 504K – Related posts
05/04/2015
AVRO 504K
AVRO 504N – Introduction
07/08/2010
AVRO 504N
 The AVRO 504N was an upgraded version of the standard British trainer, the AVRO 504K. The main difference was the new engine, which was bolted on, as opposed to the rotary engine in the 504N, plus an improved landing gear.
The model will be made in scale 1:5, which gives a model with the following dimensions:
Wingspan: – m
Length: – m
Height: – m