Category Mitsubishi Ki-46 Dinah

Mitsubishi Ki-46 Dinah – Introduction

Although fighter and ground attack versions of the Dinah were developed, it was as a high-altitude photographic reconnaissance aircraft that the Ki-46 was most successful. Indeed, it was so successful that Germany tried to acquire manufacturing rights from Japan.

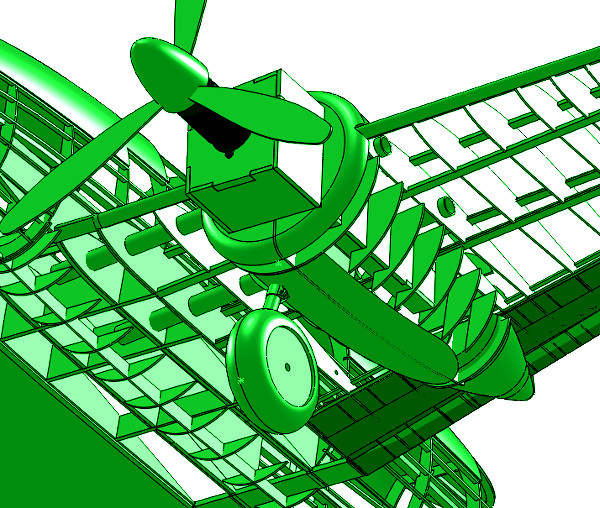
The Ki-46 first flew in November 1939 . The top-speed of 540 km/h was 60 km/h slower than required, but it was still faster than the latest Japanese fighters! New engines were attached during 1941, and the Dinah reached its required speed of 600 km/h. The Mark III Dinah which is the one I will be modelling here, had further improved engines, and a more stream-lined cockpit area, giving it a speed of 630 km/h.

The aircraft was first used over China, but the most successful missions were those flown over British Malaya before the Japanese invasion. Its high-altitude capabilities and long range meant that the Dinah could cover the entire Pacific theatre with almost no opposition.

The Dinah became vulnerable to fast-climbing Allied fighters at the end of the conflict, but still made many reconnaissance missions over the large American air-bases in the Mariana Islands at the end of the war.

Specifications:

Crew: 2 (pilot and observer)
Length: 11.00 m (36 ft 1 in)
Wingspan: 14.70 m (48 ft 2¾ in)
Height: 3.88 m (12 ft 8¾ in)
Empty weight: 3,263 kg (7,194 lb)
Loaded weight: 5,050 kg (11,133 lb)
Max. takeoff weight: 5,800 kg (12,787 lb)
Powerplant: 2 × Mitsubishi Ha-102 Army Type 1 14-cylinder radial engine at 1,080 hp
Maximum speed: 604 km/h (326 knots, 375 mph) at 5,800 m (19,000 ft)
Cruise speed: 400 km/h (217 knots, 249 mph)
Range: 2,474 km (1,337 nmi, 1,537 mi)
Service ceiling: 10,720 m (35,200 ft)
Climb to 8,000 m (26,250 ft): 17 min 58 sec
Guns: 1× rearward-firing 7.7 mm (.303 in) Type 89 machine gun


Mitsubishi Ki-46 Dinah – 3-Views

The 3-views I will be using come from the Japanese magazine “The Maru Mechanic”, November 1978. It is extremely detailed, and it should not be a huge problem drawing this set of plans.


Mitsubishi Ki-46 Dinah – Documentation

I have been to RAF Hendon in the UK, where they have the last surviving Dinah. I’d like to thank the lady guard from Zimbabwe for having time to chat with me, and for letting me cross the barriers and take some photos of this elegant aircraft.

In addition to the walk-around from RAF Hendon, I also bought the November 1978 issue of Maru Machanic which is dedicated to the Dinah.

So, all in all, I have enough documentation to get started.


Mitsubishi Ki-46 Dinah – Scale size

Oh, I forgot, the scale will be 1:5, giving the model a size of:

Wingspan: 2.94 m
Length: 2.20 m
Height: 0.776 m

Mitsubishi Ki-46 Dinah – Fuselage

I love the way the Japanese designed their fuselage formers. Simple and straight-forward. Why did the rest of the world have to make things so complicated? The fuselage of the Ki-46 Dinah had the same cross-section as the Tachikawa Ki-55, and the Mitsubishi Zero, i.e. two ellipses with different vertical radius, joined at the thrust-line. It just could not be simpler.

The 3-view from Japan was also extremely accurate.

This is the quickest I have ever made the fuselage formers – EVER! Doesn’t it just look so incredibly fast?

Mitsubishi Ki-46 Dinah – Fuselage crutch

The fuselage does not have an engine. It’s basically an empty shell. I am holding it all together with a crutch. I am almost done drawing the stringers and “hollowing out” the formers. It’s coming together quickly.


Mitsubishi Ki-46 Dinah – Longerons

The fuselage is done. It took me about 11 hours from the time I started, to where I am now. I am very happy with that. It’s still the fasted so far.


Mitsubishi Ki-46 Dinah – Wing thickness

I just found my first discrepancy on the 3-view. The front view shows the wing has a thickness of 11.5%, while the side view says 15% at the root. Which one is correct? I have no information in the Maru Mechanic book, and nothing on the internet. I have to resort to looking at pictures of the real aircraft.

After looking at photos of a real Dinah, it is clear that, not only is the thickness of the airfoil in the 3-view wrong, but so is the shape itself. The real Dinah has a very thin wing (11.5% is probably realistic), but it is almost flat-bottomed.

Looking through the Maru Mechanic, I found that the best fit between the photos and the drawings, is the drawing of the cut-out at the engine pod. It has a flat bottom, and a 12% thickness. Perfect. I am quite sure that is the right airfoil.


Mitsubishi Ki-46 Dinah – Lofted

I’ve finished the lofting of the wings and the engine pods. It looks incredibly fast, which of course it was.

It reminds me of the de Havilland DH-88, speed record breaker from 1934. I love it.

Finally, I have made the cut-out in the fuselage where the wings are going to sit. The width of the fuselage is 24 cm, each wing panel is 1.25 m and the fuselage 2.2 m. Will it fit in my car?


Mitsubishi Ki-46 Dinah – Wing design

I have started on the wings. Apart from the engine boxes, they are of completely standard construction.

The wings are at a 5 degree angle (top side).

From a strength point of view, it may be a good idea to keep the wing-tubes in the wings straight, and the tubes in the center section at an angle.


Mitsubishi Ki-46 Dinah – Wing done

I’ve completed the wing. There are two main spar, and a sub-spar. For clarity, I did not draw the webbing.


Mitsubishi Ki-46 Dinah – Engine pod

My next problem is that the airplane I wish to model, the one at the RAF Cosford museum in the UK, and the three-views that I am using do not match 100%. I already knew about the cockpit – since it is so obvious – but the engine pod is also slightly different.I should have realized that, since the engines on the Cosford Dinahs are more powerful than the ones on the three-views.

The engine pod on the Cosford Dinah is slightly longer than the one in the three-view, and it does not end in a single point, but in a nice rounded shape.


Mitsubishi Ki-46 Dinah – Engine pod II

I finally got round to doing this. It was quite tedious getting the correct location. The wing has 6 degrees of dihedral, 2 degrees angle of attack, and the landing gear is perpendicular to the ground. Phew!

Mitsubishi Ki-46 Dinah – Engine pan

I have now got the engine pod done – well almost. There is no motor mount yet, but it’s starting to look good.


Mitsubishi Ki-46 Dinah – Engine box – Part 1

The engine box is a square box inside the engine pod. It is part of the wing, and the wing-tubes go straight through it. The remaining parts of the engine mounting box are quite straight forward to draw, with the exception of the landing gear bay, and doors. It might even be necessary to adjust the box height, to make room for the landing gear. I will do the landing gear next.

Mitsubishi Ki-46 Dinah – Elevators

Today I got the elevators done, and that includes adding crutches to the fuselage that the elevators can rest on, and the R/C elevator arm.


Mitsubishi Ki-46 Dinah – Landing gear

I have now replicated the Dinah landing gear. This is the first time I ever do this by myself, and I am rather worried that the metal will bind, or the hydraulics won’t me strong enough, etc. etc.

In any case, the engine box is too small to hold the landing gear. I will have to do something about that next.


Mitsubishi Ki-46 Dinah – Ailerons

The ailerons have now been done – sort of. I still need to add the control horns, and the hinge line is a few tenths of a degree off, but that’s it.


Mitsubishi Ki-46 Dinah – Rudder done

The rudder has now been done, as well as templates for the wingtips.

Mitsubishi Ki-46 Dinah – Cockpit frame

The cockpit frame was missing at the rear cockpit. This has now been rectified. I have colourized the picture for ease of understanding. the blue part is the cockpit window.


Mitsubishi Ki-46 Dinah – Wing crutch

Done the wing mounting. It basically is a box below the fuselage crutch. Incidentally it also results in a really empty cockpit.

I have not drawn the cockpit floor yet. It will separate the cockpit from the wing tubes.

I have not decided on the belly-pan, but it might be possible to put all the RC stuff under the floor.


Mitsubishi Ki-46 Dinah – Flaps

The flaps were much easier to draw than I had expected. A proper walk-around made this a doodle – well almost. I had to move a wing-spar to get a hinge attachment point. The hinge, by the way, is not visible from the outside. I think a piano hinge, or some kind of nylon hinge will work.

The leading edge of the wing is really thin, so if I have to attach the flap, there is really very little left of the wing, than the top sheeting. This will be a challenge to build.


Mitsubishi Ki-46 Dinah – Belly pan

The belly pan is now done. I painted it grey in GIMP, since it was too difficult to identify when green in colour. The blue bits are the cockpit glass.

Mitsubishi Ki-46 Dinah – Intro Video

I have decided to make videos of the build. I made the intro today and hope you like it.

Mitsubishi Ki-46 Dinah – Airplane Stand

I built this airplane stand specifically for the Dinah build. It can of course be used later on for other aircraft. It is 1 meter long and 40 cm tall. Here is the construction video.

Mitsubishi Ki-46 Dinah – Plans Finally

The plans for this awesome aircraft are finally (almost) here. I still have a to-do list, but I just could not help myself. I simply had to see what the plans would look like. And they look AMAZING!

Mitsubishi Ki-46 Dinah – Engine box

boxI have done some cleaning up around then engine box over the last couple of days. First and foremost, I got the wheel-well cut, and completed the engine box. The firewall is 12 mm thick, and the rest of the box has 6 mm sides.

I also drew the wheel-covers. On the picture, the wheel is not retracted, but it now fits inside the wheel-well.


Mitsubishi Ki-46 Dinah – Wing saddle

wingseatAll the while, I was planning to attach the centre section of the wing directly to the fuselage. I later realized that that would mean it would be impossible to access the electronics in the fuselage – unless the canopy glass is used as an access hatch. So, I made a wing saddle. Whether I use it or not, I do not know, but now it’s there. If I can find a massive scale hatch – maybe the one in the fuselage used for loading cameras and film onboard – then I will use the hatch, otherwise I will have to make the wing removeable.


Mitsubishi Ki-46 Dinah – Done!

DinahPlansI have decided that I am done and the 3D model has been converted to a set of 2D plans. It took an entire Sunday, but it was worth it. This afternoon I will print them out. A few items in my to-do are still not done, like determining the location of R/C components. I will do those after the aircraft is built. Anything missing on the plans will also be found during the prototype build. So, YAY! I can start cutting wood.


Mitsubishi Ki-46 Dinah – To-do list

I need to do the following:

  • Wings.
  • Engine cowls.
  • Engine pans.
  • Elevators.
  • Landing gears.
  • Ailerons.
  • Rudder.
  • Wing center section.
  • Fuselage formers and wing crutch.
  • Wing tips.
  • Flaps.
  • Belly pan.
  • Install landing gear in aircraft – Angles are off.
  • Engine mounting box.
  • Landing gear doors.
  • Separate wing crutch from wing centre-section to make it possible to gain access to the inside of the fuselage for battery, radio etc. equipment.
  • Clean up fuselage around windows and the wing trailing edge.
  • Draw wing saddle.
  • Convert 3D model to 2D plans.
  • Make cut-out in wing trailing edges to make room for the flaps.
  • Add control horns to ailerons and the rudder.
  • R/C Installation.
  • Note down any problems with the drawings during build process.

Mitsubishi Ki-46 Dinah – Related posts

Comments

  • Brian Hannigan  says:

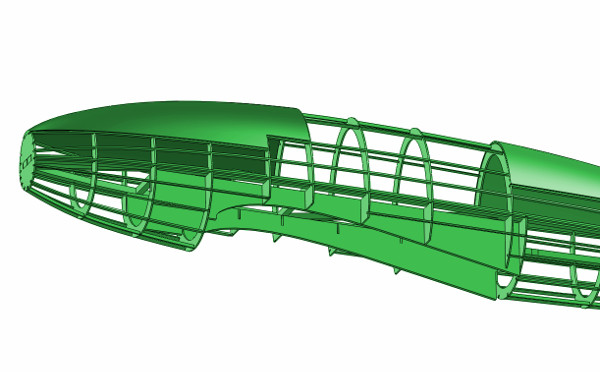
    That open area inside the fuse will do nicely for a 3D printed cockpit

  • admin  says:

    Yeah, or we could just 3D print the entire airplane and kill off our hobby. It is only a matter of time before we all sit in front of computers.

  • Carl Hampton  says:

    Very fine work, If you are willing to sell plans I also am very interested in purchasing a set. It is a really beautifully shaped airframe and rather unusual as well. I’d love to build one but am having difficulty finding three views much less plans……

    carl

  • admin  says:

    Plans will be available after I complete the prototype build. I have sent you an e-mail with more details.

  • Owen Reed  says:

    A wonderful incite into CAD designing. How is the prototype coming on?
    A master piece.

  • admin  says:

    Hi Owen,

    Thank you for the kind words. I have just started building the thing. You can see the progress on my youtube channel.
    https://www.youtube.com/user/spotgreeen

  • james  says:

    Hello I am interested in the planes but i don’t see information about them posted anywhere. Will someone please guide me to them.

  • Breandan Hadley  says:

    Hello, my compliments on an outstanding job on this rare aircraft! I would love to purchase a set of plans when they become available?

  • Salvatore Calvagna  says:

    Would love to have a set of plans. Are they available?


Leave a reply